I saw Donna's tutorial about taking good shots in the game, and then thought I'd do this little tute quickly as a follow on to explain how some of us get our images so crisp and looking sweet - it's a guaranteed way of making your sims look schmick coz there's only so much your graphics card can do for you.

so firstly we start off with our basic screenshot that we've gotten out of the game - donna's tutorial covered that but for the sake of a quick run-down again I use Aikea Guinea's animation paintings and Decorgal's Pose Box. when I do my screenshots, I just put them into MSPaint and save them as a PNG file so I can edit them in good quality later on in photoshop.
a note here though...I don't actually PLAY with my settings this high in the game. when I'm taking screenshots, I make sure that I turn my settings up to the maximum possible and once I'm done taking my pics I turn them back down again...the highest settings are generally just for when I wanna show off, lol.
here is the basic screenshot I'm starting with for the tutorial (click it to view the full size...I downsized because I have uber screen res):

just a pic of a sim of mine, posed using a hacked object.
the first thing I'm going to do is cut her out of the background, but this is
optional - in this instance I specifically wanted just a picture of the sim herself so I didn't bother with a decent background scene for her but if you've gone to the trouble of setting up a scene you don't have to do this bit at all. I do this using the pen-tool - there are many tutorials around on how to use the pen tool if you google them so I won't go over it.

there she is on a plain background (personally I choose to use a 15% grey out of the colour swatches...off-white works a little bit better for sims).
next thing you need to do is to duplicate the layer (in the layers tab you right-click then choose "duplicate") so that you have two copies of the sim. set the second layer (the one on top) to
soft light from the drop down box in the layers tab and adjust the opacity to something a bit less contrasting - in this instance I chose
75% opacity:

so far what we've done is made the colours of the sim and her clothing richer and more vibrant - now we want to give her some depth. select the first sim layer (not the one you just changed to soft light) and in the photoshop menu select
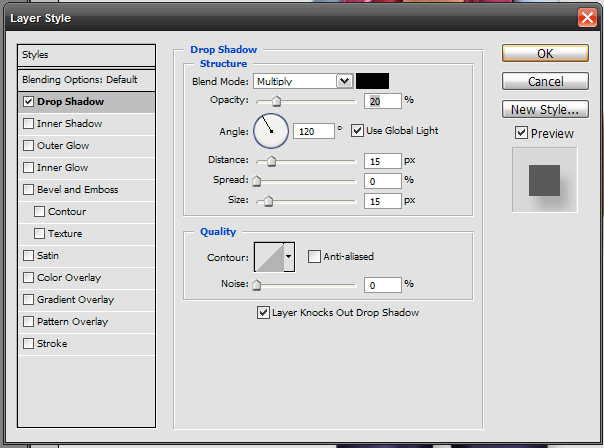
Layer -> Layer Style -> Drop Shadow. it is important at this point to remember where your lights were in the game - if the lights were to the left of the sim, you don't make the shadow cast to the left for example.
my lights were shining overhead from the left, so I want my shadow to cast down to the right behind the sim - I don't want something too harsh, I want it nice and soft so I set my settings to these:
and here's the effect it creates on the sim:

you can see it is subtle, not too overdone and just adds a slight bit of depth to the picture.
we're almost done - from here we're just gonna add the final touches. go back to the layer that is set to soft light and go to "
Filter -> Sharpen -> Sharpen". this will just crisp the image up a little bit and make your sim's clothing textures look great.
the final trick is the
eyes. have you ever looked at the really good sim picture takers like keely (linuslover30) and wondered how the HELL their sims' eyes look so damn good compared to what yours look like in the game? it's all done in photoshop - the eyes don't REALLY look that good in the game.
still on the layer that is set to
soft light, using the lasso tool in photoshop draw a circle around the sim's eye and then repeating the "
Filter -> Sharpen -> Sharpen" step will make the eye glitter like glass. repeat the step with the other eye and then flatten your image and you're done.
here's the finished result:

hope this was helpful guys - any questions or comments feel free to post.

